Monday, August 5, 2013

DIY - Part 2 - Pergola

Part 2: PERGOLA

A little disclaimer... these DIY Series posts are intended to give you a general idea of how to build simple structures and/or complete easy weekend projects around the house. This is not a step by step instruction manual as everyone's situation is different. If you have any questions or comments regarding our series please feel free to post a comment and we will do our best to answer your question!

Let's stick with our outdoor theme for a bit. Here in Part 2 we will focus on pergolas; not to be confused with trellises... What is the difference? Trellises are generally free-standing structures made out of wood or metal with crossbars. They can be attached to a wall (see part one). Pergolas are also structures with crossbars but they are supported by pillars and can be used to cover a seating area, patio, or a walkway.


Pergolas also add a more luxurious appeal to an outdoor area. While you would probably want to build and install your trellis in your front yard (i.e., over an entry or at your garage door) your pergola will most likely spice up your backyard! 

This is a relatively easy structure to build over a weekend. The materials and details are really up to you. Get creative with it. There are tons of HOW TO guides all over the internet but you should always try to make your projects your own. As far as the size, color, and detail of your pergola? This should all be up to you. Just remember, the larger or longer your pergola, the more support posts you will need. For arguments sake, let's consider installing a 10' x 10' pergola.

Note: If you are going to be installing your pergola in grass you will have to set your posts in concrete. A good rule of thumb would be to dig down 36" and a diameter 3 to 4 times the size of the post; however, you should check with your local municipality to make sure you are adhering to their guidelines and code. 

Assuming you will be installing your pergola on an existing concrete patio you will need to start with post anchors. For a 10' x 10' pergola you will need 4 4"x4"x10' posts. The type of wood you choose should be dependent on your local weather patterns. Cedar is a good choice because it weathers well; however, some people choose pressure treated wood and then paint the pergola. Your post anchors come in different sizes so make sure you choose the correct anchor for your post size. You will use Tapcons to connect your post anchor to the concrete and wood nails to nail the anchor to your actual post. Use a level to ensure that your posts are being installed straight. 

Next you will attach the support beams. There will be four beams running perpendicular to the posts on the outside and inside of the pergola. Cut 2" x 6" beams to size and install them on either ends with wood screws. You can decide to go with a very basic edge detail or a more intricate edge detail if you have access to a router. See below for different types of edge details:


Basic


Detailed


Finally you will add the crossbeams. Measure the cross beams (again using 2" x 6" boards) and mark the area where you will need to notch the cross beams in order to bracket into your support beams. With a 10' x 10' pergola you should have between 6 and 8 cross beams. Again, this is a matter of personal preference so add as many you would like. Notch your cross beams with a table saw (as mentioned in part 1, if you do not have tools, you can have the hardware store pre-cut all of your lumber). Attach your cross beams to your support beams and use a wood screw (long enough to successfully reach and adhere to support beam) to attach both beams. Again, edge detail for your cross beam is up to you. 

Add a diagonal brace at each post and connect to to the support beams for additional reinforcement.


You can leave your pergola as a raw wood structure (not recommended unless you are using a sustainable wood) or you can stain or paint it. Here are some examples of pergolas:


So there you have it! Another easy weekend project that will not only give you something to do but also increase your home's backyard appeal! 

Blog post by Aja De Los Santos, GM & Head Designer at Investcove Properties

Friday, July 26, 2013

DIY - Part 1 - Trellises

Part 1: TRELLISES

Who doesn't enjoy a nice DIY project? My DIY project of the day was looking up the pluralized form of trellis. It is trellises by the way, in case you didn't know... cause I didn't :/

Anyways! Let's start this DIY series off with my husband's favorite outdoor accessory, TRELLISES! A well appointed trellis is like a fine glass of wine or a decadent chocolate cake. It is bold yet understated, refined, and subtle. Adding a trellis to any outdoor area adds an element of luxury, almost immediately increasing curb appeal! Should we start a drinking game? Take a shot every time I say a derivative of the word trellis. I will wait while you catch up...

Let's start small with an over the garage door trellis. Disclaimer; please make sure you are sober before handling any power tools!


This type of trellis is an easy weekend project and as mentioned above will add a luxurious element to your exterior facade. Start with the brackets on either side of the garage. The garage in the picture above is fitted for two cars but you can build your trellis for any size garage. The longer the width, the more reinforcement you will need. In the above image it was necessary to insert a bracket between the two doors. If you do not have this option (i.e., if you have a two car garage and no space in between) you may have to fix a small reinforcement piece in the center of the trellis. However, a standard two car garage door should sustain a trellis with only two brackets on either side. Use 2x4s for your bracket backings and cut them approximately 25" long. I suggest using pressure treated wood. Secure these bracket pieces to your home's exterior with the proper hardware (i.e., if you are screwing into concrete you will need a Tapcon). Your local hardware store will be able to help you find the proper fastener. 

Next come the decorative pieces you add to the bracket that is fixed to the garage or exterior surface (technically still part of your bracket). These pieces hold up your joists (the beams that run along the width). The above picture uses a 2x8 for the top piece and a 2x6 for the lower curved piece. These curves and notches are achieved through the use of finish carpentry equipment (most likely a router). If you do not have access to this type of equipment you can mark your wood and bring it to your local hardware store and they will cut it for you (some charge a minimal fee). You will screw these additional bracket pieces into the fixed bracket base with wood screws. There are really no exact measurements for the brackets so I would say this is where you need to get a little creative. The picture below shows another trellis option with less intricacies in the bracket design. 


Next you will cut and install the joists. These are the pieces that run parallel to each other across the span of your garage or exterior opening. Use 2x6x12s or which ever length you need for your respective space. The key here is using a 2x6 material. Finally you can use 2x2 pieces to finish the top running perpendicularly to the joists (you can find nice finished 2x2 pieces in the fencing section of your local hardware store). I would suggest setting them approximately 6"-12" apart depending on your preference and they should hang over your joist piece about 4". 

The very last step is to paint your trellis and then you are finished! This is a very easy project. If you organize your layout and sizes and know what you need you can simply go to the hardware store with your list and have all your material ready and cut before you leave! Below are some additional pictures of over the garage trellises. Enjoy the project and get creative. There is no need for an extremely detailed set of instructions. Every trellis is different and you should find a way to make it your own!


So now you know how to build a trellis and more importantly you know how to pluralize the word! If you have any questions please feel free to comment below and stay tuned for more DIY projects in the series!

Blog post by Aja De Los Santos, GM & Head Designer at Investcove Properties

Monday, July 8, 2013

Due Diligence


This post is on the importance of doing your homework before you start any home improvement project. I recently received a call from a person who had started remodeling their kitchen and received a stop work letter from the city in which they live. This was a simple case of not knowing the rules and regulations that the city imposes on construction work within its limits. They had decided to remodel their kitchen themselves in order to make the process more affordable. They ordered cabinets from a local cabinet company and had friends and family begin demolishing the kitchen. By the time the old kitchen was completely removed, the city posted a "stop work" order and referred them to the building department. Generally if a county or city catches someone in the process of construction without proper filing and permitting they will issue a stop work order until the person properly records and permits the construction work. Permitting is of course fee based but receiving a stop work order can often result in additional fines. 

They quickly found out that there are specific documents and guidelines that they should have followed in order to complete a kitchen renovation. They also found out that the condo association where they live does not allow homeowners to do the work themselves and that they would have to hire a licensed contractor. This is where Investcove Properties comes in. They called us in a panic and asked if we could help. We met with them and began the permitting process (which should have been started prior to the remodel). The problem with this is that permitting can take up to six weeks depending on the jurisdiction and in the meantime these people had no kitchen! We could not continue the work until all of the permits were issued.

After we received the permits (approximately two weeks later) we scheduled one of our crews to begin work on the kitchen. Here is where another problem arose. The company that they purchased their cabinets from measured the kitchen incorrectly. This poses a very difficult problem. When purchasing a semi-custom kitchen it is imperative that all measurements are accurate. There are pieces called "fillers" that help to create a custom look by filling in areas that need to be spaced in order to properly fit the space. When there are gaps in the cabinets and the fillers are not installed you will see air between the cabinets. In this situation not only were the cabinets measured incorrectly but the company did not provide adequate fillers.


This is an example of a cabinet filler. In this situation the semi-custom cabinet width did not mount flush with the wall so a filler was used to complete the space.

The people in this situation simply wanted to upgrade their kitchen while saving money. They purchased the cabinets from wholesale cabinet company (i.e. $999 10' x 10' kitchen) and had the intention of doing the work themselves. Because they did not do their due diligence prior to starting the work the project ended up costing them far more than they anticipated in both permitting and legal fees and installation labor. In addition, because the cabinets were not measured properly it forced an imperfect kitchen installation. We did our best to adjust the cabinets and make the kitchen look as complete as possible but without the proper fillers and correct measurements it is next to impossible to do so without additional custom work.

Here is my advice to anyone considering going at it alone:

1) Determine whether or not the work you are considering requires a permit. Most work does require a permit so it is important to properly document the work prior to beginning any remodel. You can do this by contacting your local City or County office, explaining the work you are considering, and inquiring on the permitting process.

2) Determine whether or not you can actually do the work yourself. If it is something that seems beyond your scope then call up some contractors, get some estimates, and save money until you are ready.

3) If you purchase materials from an outside vendor it is imperative to ensure that the measurements are accurate. A contractor who comes in to install the materials but does not order them will not take responsibility for items that are ordered incorrectly. When you order materials through the same contractor who installs them they will always guarantee their accuracy but when you order from a separate source it is that company's responsibility to correct their mistake. 

Blog post by Aja De Los Santos, GM & Head Designer at Investcove Properties

Tuesday, May 28, 2013

Remodeling 101: Part 3 - Budgets

Part 3: BUDGETS


The most common question that I receive when I meet clients during the initial consultation of any renovation project is, "How much is this going to cost?". This is not a question that can be answered on the spot. There are many variables that go into estimating any construction project and it is important that the contractor is able to do their due diligence before disclosing cost figures. It is one of the reasons why people are told to get multiple quotes. You would be surprised how much estimates can vary from one contractor to another. 

I like to know my client's budget up front. However, finding this out, is more often easier said than done. People are hesitant to disclose their budgets up front. I understand this mentality... The client is concerned that if they tell the contractor their budget is $15,000 and the actual cost is around $10,000, the contractor will automatically bill up to the client's budget and pocket the difference. I am not saying this doesn't happen, however, if you have done your research and hired a reputable contractor it most likely will not.  

I have had several projects in which I was able to come in under the client's budget and others in which the customer had unrealistic expectations of what their desired improvements would cost. In either situation I can explain and justify the costs and offer solutions to reduce the costs if need be. 

Here are two examples:

Client A (under budget) - Wanted his bathroom remodeled for around $7,000. He received multiple estimates from other contractors for around $10,000 but couldn't justify spending that amount of money on "such a small bathroom". After meeting with both him and his wife and discussing their expectations Investcove was able to complete the job for around $6,300.

Client B (unrealistic expectations) - Wanted her 2,500 square foot home completely renovated including a full gourmet kitchen, custom laundry room, two bathrooms, removal of existing tile and installation of hand scraped hard wood flooring throughout, brand new impact windows and doors, interior and exterior paint, and filling a sunken living room in with concrete. This was an extensive remodel that included heavy duty plumbing and electrical work. In addition, this client chose very high end and expensive materials. She did not disclose her budget upfront but we later found out that she estimated all of the work to cost around $70,000 which was about $30,000-$40,000 less than the actual costs based on her material choices. 

Client A was obviously happy because their remodel came out around 10% less than anticipated. They had a feeling that $10,000 was too much money for their bathroom remodel and they ended up being right. The fact that we knew their budget upfront allowed us to suggest materials that we knew would be conducive to their budget and in this case even came in under budget! This doesn't always happen but we definitely always try. 

Client B was panicked because she received the estimates and was shocked by the pricing. In this case, if she had disclosed a $70,000 budget up front we could have sat down with her and explained why it was unrealistic and how we could get the costs down to where she wanted them to be. 

If you are considering a remodel but have no idea what things costs or what your budget should be here are some suggestions to point you in the right direction:

1) Ask around - Talk to your friends, relatives, and neighbors. Talk to anyone who has completed a remodel in the past year and ask them how much they spent. I know, I know... this is not the most comfortable conversation to have but if you explain why you are asking they will be more than happy to help.

2) Google - Go ahead! You know you Google everything else. Google, "bathroom remodeling costs" or "cost to install new flooring" and read some of the message boards to get an idea of what things costs. As with everything else on the internet... keep an open mind and take everything with a grain of salt!

3) Research - Look at some of our earlier posts on HOW TO: Hiring a Contractor. Do your research and only call contractors that are reputable. Receive recommendations from friends or other trades that you do business with. Make sure they have a portfolio and ask them about their experience in project management and working with budgets.

4) Pictures - Have inspiration pictures for your contractors when they come to the initial site visit. There are multiple ways to achieve one look and pictures can help your contractor guide you in the right direction for your desired outcome and budget.

5) Full disclosure - Tell the contractor your budget. By now, you should have honest and reputable contractors in line and you need to trust that they will do everything within their power to provide you with the best possible pricing. 

6) Trust your gut! - I think this is true of everything in life... trust your intuition! If you have a bad feeling about a contractor then leave it at that and do not do business with them. On the other hand, if you have a good feeling about a contractor then you should probably trust that you are making the right decision! 

If you have any questions on construction budgets please feel free to leave a comment or you can head on over to our Facebook page and post to our wall or private message us! 


Blog post by Aja De Los Santos, GM & Head Designer at Investcove Properties

Tuesday, May 14, 2013

Remodeling 101: Part 2 - Bathrooms

Part 2: BATHROOM REMODELING


A typical bathroom remodel takes 2-6 weeks, depending on complexity. This overview includes the most common elements of a bathroom remodel. It is important to review and understand these elements in advance before hiring a designer and/or contractor. This will help the professionals you work with create a design and project overview within your budget and time frame.
  • What is your budget for this project?
    • As mentioned in our previous post, it is important to discuss your budget with your contractor and/or designer. A qualified design/build firm will have experience in working with budgets and be able to guide you in the general direction to meet your needs. They will not increase their fees to match your budget or try to convince you to increase your budget. They will explain to you if and why your budget is on target or unrealistic. 
  • What is your goal for the remodel?
    • Are you looking to update, add space, or both? What is the ideal bathroom you envision yourself in?
  • Technical aspects of the bathroom remodel include:
    • Current square footage and desired square footage.
    • Will your project require an engineer or architect? Most likely you will not need either unless you are moving walls and/or the ceiling.
    • Does your project need to be permitted? Your project will require a permit if you are moving electric and/or plumbing. Check with your local municipality for permit regulations. Your contractor/designer will be able to advise you on local rules and regulations.
      • Your designer/contractor can help you with these technical aspects but having a general knowledge of what may come up in your initial conversation is very helpful to both parties.
  • Other elements of the bathroom remodel include electrical, lighting, walls, plumbing, windows, doors, shower/tubs, toilets, vanities/cabinets, counter tops, sinks, and flooring.
    • Electrical - Will you need a service upgrade? Do you need a sub panel? How many outlets and switches will you need? Would you like your lighting on a dimmer switch?
    • Lighting - What type of lighting fixtures would you like? Do you want recessed lighting and/or flush wall mounted lighting? 
    • Walls - Will you need any wall paper removed and/or installed? Would you like the walls textured or smooth? What color and finish of paint do you envision for the walls and ceiling?
    • Plumbing - Will the plumbing need to be upgraded and/or relocated. Most of the time, I advise my clients that we will be upgrading their plumbing behind the wall. The reason for this, especially if it is a newer home, is that the builders use inexpensive materials that are no longer sufficient. 
    • Windows - Are there any windows that need to be removed, moved, or installed?
    • Doors - Are there any doors that need to be removed, moved, or installed?
    • Showers/Tubs - You will have to decide if you would like a tub/shower area or shower area only. If you would like a tub what type/color would you prefer? Do you want tile on the floor or back splash  Do you want a tile listello (this is the decorative band that runs around the shower walls)? Do you want a nook for your shampoo/soap? What type of materials would you like? Pattern? Tile Size? Grout color? Do you want an installed bench? Do you need grab bars? Do you want a glass door? What type of faucets would you like?
    • Toilet - Will you be keeping your existing toilet? If not, what make, model, and color?
    • Vanity/cabinet - Will the vanity be custom ordered or pre-built? What type of material, color, and stain? What door and drawer type? What type of accessories (knobs, pulls)? 
    • Counter tops - What type of material and finish? What type of edge detail? Would you like a back splash?
    • Sinks - How many sinks? What type of sink? What color and finish?
    • Flooring - What type of flooring materials? Would you like a tile, wood, or PVC baseboard?
These are the questions your designer/contractor is going to ask you when discussing your bathroom remodel. Look at your existing bathroom and write down what you do not like. Then look at pictures and decide on the type of bathroom you would like. Talk to your designer/contractor about your ideas. Be flexible and understand that they are professionals in their field and want to help you achieve your vision. They will explain what can and cannot be done and why. You can then, together, come up with a solution and plan for the bathroom remodel.

Blog post by Aja De Los Santos, GM & Head Designer at Investcove Properties 

Tuesday, May 7, 2013

Remodeling 101: Part 1 - Kitchens

Part 1: KITCHEN REMODELING


A typical kitchen remodel takes 6-8 weeks, depending on complexity. This overview includes the most common elements of a kitchen remodel. It is important to review and understand these elements in advance before hiring a designer and/or contractor. This will help the professionals you work with create a design and project overview within your budget and time frame. 

  • What is your budget for this project?
    • I have worked with several clients who are reluctant to tell to me their budget. This is understandable as many contractors will bump their fees and estimates right up to the client's budget limit, however, most honest and reputable contractors/designers do not do this. It is important for me to understand a client's budget because it helps me shape the project within their parameters. I have had instances where we are able to complete the project for far less than the client expected as well as situations where the client's budget is completely unrealistic. 
  • What is your goal for the remodel?
    • Are you looking to update, add space, or both? What is the ideal kitchen you envision yourself in? The contractor/designer wants to give you everything you want so it is important that you thoroughly understand what you would like to achieve with your project.
  • Technical aspects of the kitchen remodel include:
    • Current square footage and desired square footage.
    • Will your project require an engineer or architect?
    • Do you need any walls removed?
    • Does your project need permitted?
      • Your contractor/designer can help you with these technical aspects but having a general knowledge of what may come up in your initial conversation is very helpful to both parties.
  • Other elements of the kitchen remodel include electrical, lighting, walls, plumbing, windows, doors, cabinets, counter tops, sinks, flooring, and appliances.
    • Electrical - Will you need a service upgrade? Sub panel? How many outlets and switches are there and how many will have to be installed?
    • Lighting - What type of lighting do you want? Recessed lighting or mounted lighting?
    • Walls - Are there walls that need to be removed or moved?
    • Plumbing - Will the plumbing need to be upgraded or relocated?
    • Windows - Are there any windows that will need to be moved, removed, or installed? What type of moldings will be installed around these windows?
    • Doors - How many doors will need to be moved or installed? What type of doors? What type of moldings?
    • Cabinets - Would you like your current layout replaced or redesigned? What type of cabinets would you like? Custom? Semi-custom? What type of color and finish will the cabinets be? What type of drawers and doors? Will there be any custom built-ins?
    • Counter tops - What type of counter top material would you like? What color? What type of edge detail? Will there be a different type of back splash installed?
    • Sink - What type of sink? Under mount? What size sink? What type of faucet?
    • Flooring - Will flooring need to be removed? If so, what type of flooring would you like installed?
    • Appliances - What type of refrigerator, disposal, range/oven, range/hood, dishwasher, microwave would you like? What are the sizes?
Your contractors/designer is going to ask you all of these questions in detail. You will be able to go over everything with them at the time of your consultation, however, understanding all of the aspects and technical details of your remodel ahead of time will help you to achieve the best results. Investcove Properties provides there clients with a remodel work sheet prior to the initial consultation. This helps prepare the client for the types of questions that will be asked of them.

Blog post by Aja De Los Santos, GM & Head Designer at Investcove Properties

Tuesday, April 30, 2013

Interior Design vs. Interior Decorating


The National Council for Interior Design Qualification (NCIDQ) explains that while many people use the terms "interior design" and "interior decorating" interchangeably, the professions differ in critical ways. If you are contemplating remodeling and/or redecorating and considering hiring a designer and/or decorator it is important to understand the fundamental differences and how each professional may be able to help you with your project. 

Interior designers apply creative and technical solutions within a space that are both functional and attractive to the customer (NCIDQ). The interior designers job is to understand space and both its potentials and limitations. The interior design process includes understanding of architecture, engineering, and construction. A quality interior designer will be able to explain a room's function and what may or may not be changed. 

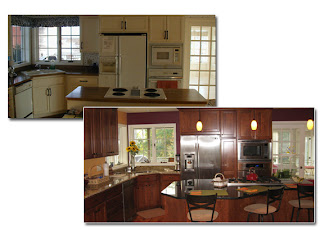
Scenario: Nancy and Bob are interested in updating their kitchen. They would like to make their kitchen larger in order to incorporate new cabinets and an island. Nancy would like the sink to be moved from an existing wall into the new island. Nancy and Bob call Mary a kitchen designer they were referred to by friends. Mary is an interior designer who specializes in kitchens. Mary explains the process of expanding the kitchen, installing an island, and moving the sink. Although she is not a contractor, she has enough fundamental knowledge to understand what will and will not work with Nancy and Bob's new kitchen design.

Example: Below is an example of interior design at work. Let's say this is Nancy and Bob's kitchen before and after. While the before and after layout is somewhat similar it is apparent that an interior designer was involved in the process. This designer squeezed the most potential out of this kitchen by adding cabinets, installing more functional appliances, creating and updated look, moving electric to create more light and aesthetic appeal, and extending the space with a misshaped island which works very well here. 


Interior decorators are not involved in the layout of the space. They are generally hired by homeowners, developers, and commercial buildings to create a look that is both desirable and comfortable. Decorators help their clients in choosing furniture, fixtures, fabrics, and miscellaneous decor. There are also instances where the interior decorator will help choose lighting fixtures and paint colors although interior designers can do this as well. 

Scenario: Nancy and Bob absolutely love their new kitchen! One night Nancy comes home from work and goes to her bedroom to change into her sweats. She goes to the kitchen where Bob is cooking dinner (how great is Bob!) and tells him that she loves the kitchen so much but now the bedroom just feels blah! They know that they will not need to move any walls around or change the layout so they consider calling Frank, a local interior decorator who just finished redecorating their favorite local restaurant. Frank comes to their home and gets an idea for their style and taste. Nancy and Bob would like a warm space with a relaxing and peaceful vibe.

Example: Below is an example of interior decorating. Again, let's say this is Nancy and Bob's bedroom. The space has not changed but it has been completely transformed by the interior decorator (in this case, Frank). The furniture placement, choice in wall color, application of wallpaper at the fireplace, and finishing pieces are all ideas generated by the interior decorator collaborating with the customer. 


Blog post by Aja De Los Santos, GM & Head Designer at Investcove Properties

Thursday, April 4, 2013

A Tale of Two Clients

 
                                           Client #1                                              Client #2

These bathrooms are not in the same home. The people who commissioned me to help them with the design and construction of the bathrooms above do not know each other yet their bathrooms are now very similar. 

The bathroom on the left is a second floor bathroom in the home of good friends of mine (I always get nervous about working with friends because I do not want to disappoint them or hurt our personal relationship). They purchased their home several years back and had completed renovations on the entire downstairs. 

Client #1:


This upstairs bathroom was much smaller prior to renovation, had tile floor to ceiling throughout the entire bath, and had no bathtub (see above). I generally try to think of resale value when I help someone renovate their home... Their second story only consists of a bedroom/loft area and this bathroom; therefore it would be a possibility for a future buyer to use this room as a master suite. With that in mind we decided to install a double vanity with two sinks and make the bathroom larger. I also think it is a good idea to have bath tubs in any extra bathroom and since their master bedroom and bathroom is now downstairs and only has a shower I suggested putting a bathtub in this bathroom. 

We made the bathroom wider and longer in order to fit the bathtub and the double vanity. We also moved the toilet over closer to the window for a little more space (it is also more aesthetically pleasing). They really didn't have an idea for a design concept and were open to doing something a little different than their downstairs renovations (which are mostly neutral) so I suggested the Carrera marble shower and Carrera porcelain floor. They were open to the idea so we shopped for the materials and choose glass and marble materials for the listello and the back splash. They were already sold on the espresso vanity with white tops which went perfectly with the material selection. 


The end result was amazing and they loved it (see above). See more before and after pictures here: 

Client #2:
The bathroom on the right (at the top of this post) is a renovation I commissioned only a few weeks after completing my friends' bathroom. This client already had a vision. They knew that they wanted an espresso vanity with white shower tile, a black river rock shower floor, and blue accent materials. They have lived in their home for almost four years and have yet to use their master bathroom shower because it has never worked and has been sitting as an incomplete project (see below).


We did not make this bathroom larger but the renovations made a huge impact and the space appears much bigger now. We re-framed the shower area and installed new materials including 18" x 6" subway tile up the shower walls and black river rock shower flooring. We used the same flooring, listello, and back splash materials as client #1 which is why the two bathrooms appear to be so similar. This client went with a darker blue paint on the walls. We also removed the overhead soffit, re-wired, re-plumbed, and installed a custom shower bench and over sized nook.


Once again we achieved amazing results! It makes me all warm and fuzzy inside when my clients are happy and can enjoy their new space! 

All in all both bathrooms look amazing and I am so happy to have completed successful renovations for each client. The espresso cabinets are a trend that I am happy about because they are classic, streamlined and will most likely be around for awhile. I always gravitate towards white and/or neutral tones because of their design longevity which is why I am glad both of these clients opted for classic materials. I really love when a client expresses themselves through a bold listello or back splash choice so long as it is not too wild or trendy. If a client wants to get a little crazy with a design aspect I always try to steer them towards a bold paint color. Paint is a great way to add personal taste without breaking the bank and it is easy to change if they end up growing out of the color choice. 

Which bathroom do you like the best?

Blog post by Aja De Los Santos, GM & Head Designer at Investcove Properties

Tuesday, March 19, 2013

HOW TO: Hiring a Contractor Series - Part 4

PART 4: PUTTING IT ALL TOGETHER 


You did your research, you found a firm that specializes in construction and design, and you scheduled and completed your consultation(s)... You decide on the contractor/design firm that you feel completely comfortable with. They understand your vision, respect your budget, and have a solid portfolio of work. Now what???
  • Paperwork
    • It is important that you review all of the paperwork that your contractor submits to you. Make sure that you completely understand the estimate, contract, and initial invoice. Discuss the terms of the contract and payment schedule with the contractor so that you are both on the same page. Most contractors will ask you to sign the initial estimate noting that any changes must come in the form of a "change order" signed by both you and the contractor. This will alert you to any changes in the original estimate before the contractor starts the work. A contractor's agreement or contract will state the job description and estimated costs. This is generally an additional piece of paperwork to protect you and the contractor (see below for further detail about homeowner and contractor protection). The initial invoice will most likely contain material costs and/or a deposit for the work (see below for further detail on payment). 
  • Florida's Construction Lien Law (Homeowner Protection)
    • According to Florida law, those who work on your property or provide materials, and are not paid-in-full, have a right to enforce their claim for payment against your property. This claim is known as a construction lien. If your contractor fails to pay subcontractors or material suppliers, the people who are owed money may look to your property for payment, even if you have paid your contractor in full. 
      • What does this mean? In short, it means that even though you pay the contractor you hire in full, if they do not pay the people who work under them you may still be at risk. You can avoid this by asking your contractor to provide you with releases of lien for every payment that you make to them. This will ensure that no other sub-contractor will file a lien on your property. For more information on Florida's Lien Law click here: http://www.myfloridalicense.com/dbpr/pro/elboard/documents/florida_lien_law.pdf
        • If you do not live in Florida, check your states construction lien law for more information.
  • Contractor Rights
    • Contractors have rights as well. If you sign an agreement with your contractor it is important that you pay your contractor. If they complete the work and you do not pay them, they have the right to file a lien against your home which could prevent you from obtaining financing or selling your home in the future. 
  • Payment
    • All contractors have different payment terms so it is important that you review and are comfortable with the terms of the contractor that you hire. Everything is negotiable so if you have an issue with the payment terms and/or schedule discuss it with your contractor and they will most likely compromise. However, please understand that it is not fair to have your contractor carry material costs throughout the duration of the project. Most contractors will ask for materials up front. Realize that your contractor is paying employees and/or sub-contractors throughout the process of your project so whichever terms you agree to it is important to adhere to those terms. It is also customary for a contractor to allow the homeowner to withhold a percentage (generally 5-10 percent) of the contractor until final walk-through of the property. 
I talk to so many people who are scared of bringing in contractors and renovating their homes because they have heard multiple horror stories... "I hired XYZ Contracting and gave them a 50 percent deposit and they never showed up!" or "ABC Building left my home a complete disaster!" I promise you if you follow the guidelines I have laid out in this series you will have no problem hiring a contractor, understanding the process, and enjoying the end results! 

This wraps up our HOW TO: Hiring a Contractor Series. If you have any questions regarding this series or construction industry practices in general, feel free to email us at INFO@INVESTCOVE.COM. We would be happy to answer any questions that you have. 


1925 Historic Cottage Renovation Project, West Palm Beach, FL by Investcove


1924 Historic Spanish Renovation Project, West Palm Beach, FL by Investcove

Blog post by Aja De Los Santos, GM & Head Designer at Investcove Properties

Friday, March 1, 2013

HOW TO: Hiring a Contractor Series - Part 3


PART 3: FREE ESTIMATE VS PAID CONSULTATION

You have found a few companies that offer both design and contracting services. You have seen both of their portfolios and want to get an estimate from each company and then make your decision. The first company offers free estimates and the other explains that the first consultation is $100 for the first 90 minutes. You scratch your head... Why does one offer similar services for free and the other charge $100???? 

While contemplating this overwhelming renovation project and all the associated costs, you think that saving $100 could help you in the long run. I mean, free is always better, right? In this post recession madness we are always looking for a great deal. We are looking to save money anywhere we can! Look, I hear you, I am a Groupon/Living Social junkie! My husband and I literally have a spreadsheet to keep track of all of our coupons and discounts. 

I love a great deal as much as the next gal, but there are circumstances in which cutting corners can ultimately cost you more in the long run. Take the previous post... Hiring a designer may cost a little extra money up front but not only will it ultimately help you save money in other areas, it will also get you the results you hope to achieve. While renovating your home is an investment, in the actual brick and mortar of your home, it is also an investment in your emotional well being as you complete the project.

 Here are some reasons why you may want to consider paying for a consultation versus only getting free estimates:

  • Beware of the "free estimate"! This is OK if you are doing straightforward work, such as putting on a roof, swapping out a toilet, or general painting projects; but if you are looking for intricate remodeling work, such as a kitchen or bathroom renovation this so called "free estimate" may end up costing you a lot more in the long run. Contractors are busy people and they are looking to streamline their work and move easily from job to job. Their time is valuable so when they are offering it to you for free there could be strings attached. Lets say you want to remodel your kitchen... You tell the contractor you want to replace your cabinets, counter tops, back splash, and redo your ceiling with recessed high-hat lighting. Most contractors will measure your kitchen and give you a price based on lower level cabinets, granite, and back splash. You sign the contract and start work only to find out that the cabinet choices they picked are not what you wanted and that an upgrade may cost you thousands more.
  • Calling a contractor and finding out that they charge $100 or $150 for an estimate or more properly called a consultation may make you balk. However, the company that charges this fee not only values their time but they also value yours. More importantly, they value your budget! I know, I know, you are thinking, "How are they valuing my budget if they are charging me for our first meeting?" This is how... This contractor is going to take their time with you. They are going to listen to your wants and needs, they will help cultivate your vision, and they will explain all of the intricacies of the construction process. They will also help to frame your expectations in regards to a timeline, budget, and end result. Instead of spitting out a "fill in the blank" estimate, they will work with you to design an      estimate for your project explaining where you can expect to cut back and where you may want to splurge. They will also explain additional costs associated with certain areas of the project that may arise during renovation (plumbing or electrical behind the wall that you cannot see initially) so you can prepare for that ahead of time. And here is the good news... 99% of the time, when you hire this contractor they will reimburse your consultation fee. 
Investcove Properties charges for their consultations. We initially performed free estimates and found that most of the customers had no intention of hiring any contractor. Investors are mostly the culprits. They are trying to get a certain price from a bank on a property so they will call multiple contractors and ask for free estimates. This is a waste of the contractors time, money, and resources. It may be free to the customer but it is not free to the contractor. They must allocate their employee's time to go out to a job and write up an estimate. This process could entail more than ten hours to complete the process satisfactorily. If a client calls me for an "estimate" I will explain the consultation process. If they are uncertain about paying the consultation fee, I will set up an appointment to come out and meet with the client (at no charge) explaining why this fee is charged. The majority of the time they decide that they would like to move forward with the consultation and have no problem paying the fee. So you have to decide if free, in this situation, is really better.

Blog post by Aja De Los Santos, GM & Head Designer at Investcove Properties

Tuesday, February 5, 2013

HOW TO: Hiring a Contractor Series - Part 2


PART 2: CONTRACTOR VS. DESIGNER

Now that you have done your research and narrowed the field down to a few qualified contractors, you get ready to call them up and schedule a time for an estimate or consultation; but, you get side tracked by a phone call with one of your friends. You explain that you are about to remodel your kitchen and that you found this awesome blog that explained the importance of doing your research. You go on to say that you found two licensed and insured contractors with great reviews and outstanding portfolios! You are super excited and then your dear friend asks, "That sounds great, but who are going to get to design your kitchen?"

WHAT???? Design my kitchen? I thought that the contractor would do that? Not so fast! Contractors are not designers and designers are not contractors. Here are a few things you should understand about contractors and designers:
  • Most contractors expect you to know exactly what you want. They meet with you and give you an estimate based on your criteria. They will not be able to assist you with a functional design or offer suggestions that may make your end result better.
  • Designers are an additional cost to the remodeling process. If you are looking for someone to help generate ideas and create a new look for your home you might want to start with a designer. One downfall to hiring a designer is that often times they do not fully understand the construction process and may have unrealistic expectations. I suggest that the designer and contractor collaborate in order to achieve the best results. 
  • Your best case scenario is hiring a company that can offer both design and contracting services. Companies like this do exist but remember... do your research  If you decide to go this route make sure that you refer back to Part One of this series. They still must be licensed, insured, and have credentials.
Investcove Properties specializes in offering both contractor and design services. We have experience in all aspects of the renovation process; thus our designers, project managers, and contractors are well versed in total project design and remodeling. But, we are the exception, not the rule. I saw a need for this type of service while working with my investors renovating distressed properties. Neighbors would often stop by our remodels and say, "Wow, I wish my contractor would have thought of this while we did our remodel." I continually strive to design and remodel with functionality and beauty as the end goal. So, when you hire a company that can offer both design and remodeling services, you will ultimately save money in the end while achieving your dreams. 


Blog post by Aja De Los Santos, GM & Head Designer at Investcove Properties

Monday, January 28, 2013

HOW TO: Hiring a Contractor Series - Part 1


PART 1

So you are ready to remodel your home but you have heard multiple horror stories about contractors leaving your house a mess or not finishing the work that they started. Well my friends, I am here to help! I am going to give you the lowdown on hiring a contractor, getting great results and with an experience as enjoyable as possible.

Let's face it, remodeling your home is not going to be rainbows and unicorns! It is an invasive process, and if you live through it you need to be prepared for some stress associated with the process. Demolishing existing materials and fixtures, covering and moving furniture, and dealing with lots of construction dust is inevitable. However, if you are aware and prepared for this ahead of time and your contractor is considerate of your personal space, you will get through it and end up with the beautiful home remodel of your dreams. 

Over the next several weeks this series will provide you with some insight on how to hire a contractor and get the best results! 

DO YOUR RESEARCH
  • Ask around town for referrals. This is one of the best way to find someone reputable; however you can always find someone through advertisements. A contractor who has invested in advertising their company and has a web site and/or various social media outlets is most likely here to stay. Look for an updated web site, Facebook page, Pinterest account, Blog, and/or Twitter account. Basically look for investment in advertising beyond a Craigslist post (there is nothing wrong with Craigslist... but it shouldn't be the contractors only source of advertisement). 
  •  If you are calling a contractor from an advertisement make sure to ask them about work they have previously done and if they have a portfolio to share with you. For example, Investcove makes 'before and after' videos of their completed projects. Demonstration of work gives the client a visual and provides a portfolio of work in process and available to be viewed at any time. If the contractor does not have anything to show, keep searching.
  • Make sure they are licensed and insured. There are laws in place to protect both the homeowner and the contractor, however, no laws will protect you if you hire an unlicensed person or company. A contractor should be able to provide you with their license, worker's compensation insurance or exemption, and general liability insurance. If your contractor does not have these items, you need to find one who does. 

Blog post by Aja De Los Santos, GM & Head Designer at Investcove Properties

Monday, January 21, 2013

The "F" Word


Not too long ago I went on a little vacay with my husband and some friends from grad school. We drove down to Key West for the weekend for a little R&R. It was a group trip and so there were some people there I had never met. One of the guys (a friend of a friend) asked me what I did for a living and I explained that in addition to working with clients renovating their homes I also worked with investors who purchased distressed property, renovated it, and resold it. He thought it was pretty cool and said that it was something he was actually interested in doing. Another girl I hadn't met before, his sister, overheard this and got up from her sun bathing position to vehemently rip me a new (((you know what)))! "You FLIP houses?", she said. I said, "Yes".

Her stance on "FLIPPING" is that it ruins the market. She proceeded to lambaste me, explaining that "people like you" hurt the market. She continued to state that we are the reason that the market is the way it is today. While I believe that everyone is entitled to their own opinion, I must respectively (unlike her retort) disagree.

Look... in any business there are bad apples. People who do not do the right thing and make the majority of people who are doing the right thing look bad. This is true in contracting, real estate, and every other industry. And then there are those of us who stick by a sound code of ethics and go about each day ignoring the negative and believing there is good in the world. However, some people wear their opinions on their sleeves or shove them down other people's throats. So, I tried to reason with the girl from Key West but she did not want to hear it.

My rebuttal... house "flippers" for lack of a better term, actually help the market. We do not take houses away from people who could otherwise purchase them with a home loan. Why? Because people who obtain a mortgage for their home purchase cannot purchase the types of properties that we do; these properties would never pass an inspection or appraise for a fair market value. We are not buying houses that need some paint or maybe some carpet replaced. We are buying houses that are in severe disrepair or have specialty issues that a normal home buyer would have no idea how to fix or even where to start. For example, the last house we purchased had: no floors in one of the bathrooms; open electrical wires throughout the entire house; no electrical panel to regulate the power; multiple roof leaks; and no functional showers or bath tub. Additionally, it also had a dangerous and structurally unsound exterior with multiple holes in the walls. When all was said and done the house needed to be completely rewired, re-plumbed, in addition to several structural repairs, with renovation costs over $100,000.

So imagine a street with ten houses, a nice neighborhood with two of these houses in foreclosure. Since the people who lived in them before the foreclosure were experiencing hardship they did not have the opportunity to invest money into their home for a very long time. Vacant houses, exposed to the elements without care from anyone fall into disrepair very quickly. Not only can this bring crime and vandalism to a neighborhood but what is happening to the property values of those other eight houses? They are falling, and quickly, because now the neighborhood is in decline due to the foreclosed, vacant homes.

Here is where the "flipper" comes in. Investors are people who have cash. They are able to purchase the property, renovate, and resell it. Because a cash buyer does not need an inspection or appraisal in order to purchase the property they are able to purchase a house in any condition. Most investors look for a ten percent return on their investment. This means if they put $100,000 into a house they would like to make $10,000. When you think about the time, money, and risk involved, ten percent is a very fair return on investment. This differs for every investor of course but from my experience this is the norm. So they will purchase a house at a discount (as compared to market value), because it is in disrepair and then renovate it, and resell it at fair market value. The neighborhood is now stabilized without the possibility of additional price drops because the foreclosed homes have been renovated thus all of the houses on the street are now at the same standard (relatively speaking).


Look... I am not trying to claim Super Hero status here, this is a business like any other business. The investors I work with are looking to make a profit; however, they also assume a lot of risk and they have a solid moral compass. They choose to turn a quality product without cutting corners. They have experienced profits and losses like any other business, but in almost every circumstance the house is sold to someone who finances the property with a FHA or conventional mortgage. They were able to purchase a house that was completely renovated, passed inspection, and appraised at fair market value.

My argument with this person fell on deaf ears. She had her opinion and was sticking to it! I felt bad... I was trying to defend my passion but to her I was the bad guy. At the end of the day it doesn't matter what other people think, you have to do what you love with strength and passion. So the moral of the story is; house flippers are people too and no matter what others think you should never let anyone get in the way of your passions and dreams. Cheesy but true!

Blog post by Aja De Los Santos, GM & Head Designer at Investcove Properties

Friday, January 11, 2013

Where it all began...


This old ranch style home was abandoned...discarded just like an old pair of running shoes. I try but cannot understand why people treat their houses so poorly. These wood or concrete structures start out as houses but become our homes. We LIVE in them, we create families, marriages, babies, and memories. We leave them to travel and explore but we always yearn for that familiar feeling of home. Coming home from a long day of work to my home, my sanctuary, or as my husband says, "our sacred place", makes me happy.

The abandoned three bedroom, two bathroom house had no flooring, no kitchen, no air conditioning, and to many people who looked at it, no potential. This was the first home I purchased for myself to live in... and at 21 years old I had a major project in front of me. My friends called me crazy but I had a vision and knew that I could make it a home.

My family had been in the construction industry for many years. All of my uncles on my mother's side of the family owned and operated their own businesses and they learned the trade from their father, my grandfather. Thus, I was a third generation family member with building and design coursing through my veins. At this time I worked for a construction company handling all of the accounting, payroll, financial reporting, and helped organize the project managers and construction schedules. I guess it really was in my blood because I enjoyed watching projects go from conceptualization to realization. I would watch 300 plus single family home communities being built at an alarming rate but without creative focus. So, once the structures were up, I started to pay close attention to the finishing details, often wondering why builders weren't more involved in what I thought was the most interesting process...design. But, these builders were rushing to finish to move onto the next job. They were more interested in getting the project done quickly and as inexpensively as possible. In their speed, they missed so many design elements that would benefit the buyer tremendously yet still wouldn't cost a lot of extra money.

So...back to the ugly brown house in the above picture. When I purchased the home I had decided that I would renoavte it little by little starting with a new air conditioner and some flooring. Whenever I had enough money to add something else I would. The next project was windows and doors, then the kitchen (I did dishes in the bathtub for quite some time), the new bathrooms, and finally the exterior. The process to most would seem frustrating and annoying but I found it fun and exciting. I was amazed at every transformation and how much the house would change after each new installation.


Finally, the finished product. When my friends and family saw the end result they all said the same thing, "Wow! I would have never had the vision for this!" This of course was quite a few houses ago and there have been many design challenges and lesson since. However, this small ranch home will always hold a special place in my heart because it was where I discovered my love of transformation. 

I continued to work in the residential and commercial construction industry for several years. I would occasionally purchase a home and renovate it then resell it. What set me apart from other "house flippers" was that I would really think about the end user and how they would live in the home for years to come. After too many years in a taxing South Florida commercial construction industry, I knew that I was not happy and it was time to do something I would truly love. I decided to find partners to work with and started to purchase distressed properties, renovating and reselling them as a full time career. 

Today, I continue to work in the distressed residential renovation and development market with my investors who insist, and with whom I agree, on turning a profit with a quality product. Additionally, I assist individual clients/homeowners who want to develop their own renovation and design visions. With my background in high end construction and real estate and my connections to obtain exclusive materials and have it expertly installed, I am able to create homes, not just houses, and on a budget. 

I love what I do. I learn something new everyday. This industry is both challenging and satisfying and my work days are filled with hard work and passion. And at the end of the day, I am able to go home to my own "sacred place". 

Blog post by Aja De Los Santos, GM & Head Designer at Investcove Properties